.svg)
How to build a Reverse ETL Pipeline: comparing a manual vs managed solutions


.png)
Reverse ETL (Extract, Load, and Transform) is the process of syncing cleaned, enriched, analytics-ready data from data warehouses back to operational systems such as CRMs, marketing platforms, and other business applications or databases.
Its emergence has enabled organizations to unlock the value of centralized data by delivering actionable insights directly into the tools used by business teams. By bridging the gap between analytical and operational systems, Reverse ETL supports many use cases including real-time decision-making, workflow automation, and improved customer engagement.
With enriched data accessible in everyday tools, teams can launch personalized marketing campaigns, improve sales efficiency, and create more complete customer profiles.
Use cases of reverse ETL
Reverse ETL pipelines, while structurally similar to traditional ETL/ELT processes, are distinct in that they reverse the flow of data, pushing it from a data warehouse or lake into operational systems like CRMs. This process requires close alignment with business teams, such as marketing, sales, and customer support, because the target systems—like CRMs—have more complex, sensitive schematic rules compared to data lakes, which typically store raw data. Unlike in a data lake, where data is relatively unstructured and serves primarily for analysis, CRMs are live systems with direct implications on day-to-day business operations. As a result, Reverse ETL demands caution, as errors in the data pushed to CRMs can impact sales workflows, customer communications, and other critical operations. This makes Reverse ETL not just a technical challenge, but one that requires deep collaboration with business teams to ensure data integrity and alignment with strategic objectives.
Here’s how various teams leverage and benefit from Reverse ETL across businesses.
Sales: Reverse ETL enables sales teams to work smarter by syncing AI/ML-driven lead scores and enriched firmographic data (e.g., company size, industry, revenue) directly into Salesforce and other CRMs. Additionally, product usage data, web activity, email engagement, and customer profiles can be combined to provide a 360-degree view of each lead’s journey—from initial interest to purchase. This helps sales reps prioritize high-potential accounts, track behavior across the funnel, calculate conversion rates, and identify drop-off points—all from within their CRM.
Marketing: Marketing teams can push behavior-based segments—such as high-intent, dormant, or recently active users—from Snowflake into platforms like HubSpot, Marketo, or Mailchimp for personalized outreach. Reverse ETL also enables the creation of lookalike audiences by syncing high-LTV customer traits to advertising platforms like Facebook and Google Ads.
Customer Success: Customer success teams can use Reverse ETL to sync customer health scores, product usage patterns, and engagement signals into tools like Salesforce or Zendesk. This allows them to proactively identify churn risks, monitor onboarding progress, and tailor support strategies based on real-time user behavior. With enriched customer data available at their fingertips, CS teams can offer more timely, personalized, and effective support experiences.
Method 1: Building your own manual reverse ETL process
In this blog, we’ll walk through building a Reverse ETL pipeline that syncs enriched lead data from Snowflake into Salesforce.
The goal is to equip go-to-market teams (Sales, Marketing and Customer Success stakeholders) with actionable insights that help them prioritize high-value prospects and proactively engage leads throughout the funnel.
For each lead, we’ll push enriched fields such as:
- Lead Score
- Web Activity Score
- Email Engagement Score
- Conversion Rate
By delivering this data directly into Salesforce, account managers gain a complete view of user behavior—from website activity to email engagement to product usage. This empowers them to focus on qualified opportunities, drive upsell and renewal efforts, and proactively reach out to at-risk prospects—all from within the tools they already use.
Prerequisites:
To build this Reverse ETL pipeline, you’ll need the following:
- Snowflake as the source data warehouse containing enriched lead data
- A Salesforce Developer Account to access and test the CRM environment
- Salesforce REST API access:
- Salesforce provides multiple APIs (REST, Bulk, SOAP, Streaming); for this guide, we’ll use the REST API for simplicity and flexibility
- Python and SQL scripts to build the custom integration
- Python will handle the API communication with Salesforce
- SQL will be used to query and prepare the enriched data in Snowflake for syncing
Step 1: Define the target schema
Create Snowflake Table that follows the schema of Salesforce LEAD Object’s Base Fields
In this example, we also need to generate mock Salesforce lead data using Faker Library.
from faker import Faker
import random
import pandas as pd
import uuid
# Initialize Faker
faker = Faker()
# Generate mock data
def generate_mock_salesforce_leads(n):
industries = ['Technology', 'Healthcare', 'Finance', 'Education', 'Retail', 'Manufacturing']
lead_sources = ['Web', 'Phone Inquiry', 'Partner Referral', 'Purchased List', 'Other']
lead_statuses = ['Open - Not Contacted', 'Working - Contacted', 'Closed - Converted', 'Closed - Not Converted']
data = []
for _ in range(n):
company_size = random.randint(10, 4000)
annual_revenue = round(random.uniform(1e6, 1e10), 2)
data.append({
'lead_id': str(uuid.uuid4()), # Lead.Id
'first_name': faker.first_name(), # FirstName
'last_name': faker.last_name(), # LastName
'email': faker.email(), # Email
'phone': faker.phone_number(), # Phone
'title': faker.job(), # Title
'company': faker.company(), # Company
'industry': random.choice(industries),
'number_of_employees': company_size,
'annual_revenue': annual_revenue,
'website': faker.url(),
'source': random.choice(lead_sources), 'lead_status': random.choice(lead_statuses),
'created_at': faker.date_time_this_year().strftime('%Y-%m-%d %H:%M:%S') })
return pd.DataFrame(data)
# Generate 100 enriched Salesforce-style leads
mock_salesforce_leads = generate_mock_salesforce_leads(100)
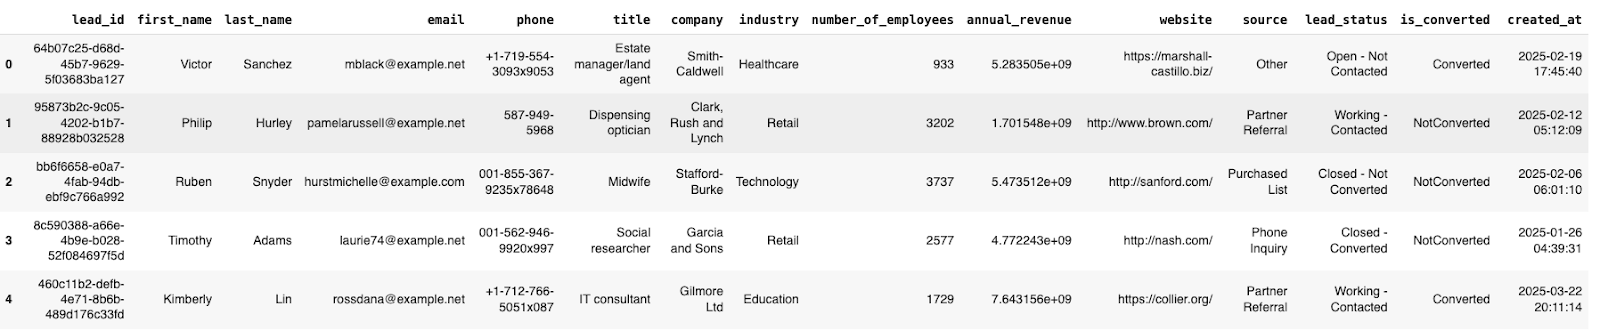
mock_salesforce_leads.head()
The output will look like this:
Step 2: Insert data into Snowflake
Using the Snowflake connector library in python, we can populate the Leads Table using the mock data.
import snowflake.connector

conn = snowflake.connector.connect(
   user='USERNAME',
   password='PASSWORD',
   account='ACCOUNT',
   database='DEMO',
   schema='MATIA'
)

cursor = conn.cursor()

insert_query = """
INSERT INTO DEMO.MATIA.LEADS
(lead_id, first_name, last_name, email, phone, company, industry, source,
annual_revenue, lead_status, is_converted, created_at)
VALUES (%s, %s, %s, %s, %s, %s, %s, %s, %s, %s, %s, %s)
"""
mock_salesforce_leads = mock_salesforce_leads[
   ['lead_id', 'first_name', 'last_name', 'email', 'phone', 'company', 'industry', 'source',
    'annual_revenue', 'lead_status', 'is_converted', 'created_at']
]

data = mock_salesforce_leads.values.tolist()
cursor.executemany(insert_query, data)
conn.commit()
This is what the table will now look like in Snowflake.
Step 3: Create web and email activity tables in snowflake
Similar to the leads table, define the schema for the web activity and email engagement data and populate it with mock data.
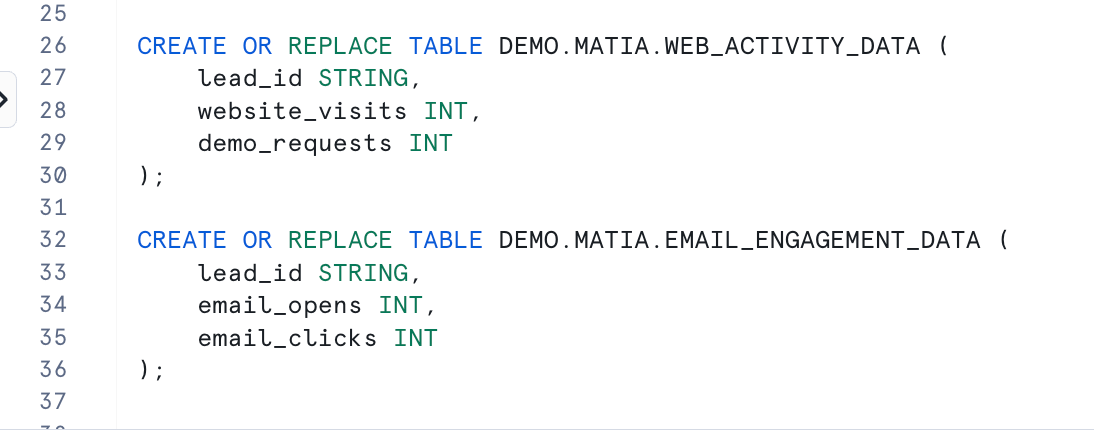
For tracking the leads’ web activity, we can count website visits and how many times they have requested a product/service demo.
def generate_web_activity_data(leads_df):
   data = []
   for lead_id in leads_df['lead_id']:
       data.append({
           'lead_id': lead_id,
           'website_visits': random.randint(0, 25),
           'demo_requests': random.randint(0, 3)
       })
   return pd.DataFrame(data)
web_activity_data = generate_web_activity_data(mock_salesforce_leads)
For Email Engagement, create mock data for email clicked and opened.
def generate_email_engagement_data(leads_df):
   data = []
   for lead_id in leads_df['lead_id']:
       opens = random.randint(0, 20)
       clicks = random.randint(0, opens)  # clicks ≤ opens
       data.append({
           'lead_id': lead_id,
           'email_opens': opens,
           'email_clicks': clicks
       })
   return pd.DataFrame(data)


email_engagement_data = generate_email_engagement_data(mock_salesforce_leads)
Now we can insert the leads data by using the snowflake connection we created in step 2, by using the INSERT INTO command in the python script itself.
Go back to your snowflake account, and you will see that the email_engagement_data and web_activity_data table is now populated.
Step 4. Enrich the leads data with engagement metrics
Before we can load this data into Salesforce using its REST API, we need to enrich the leads data by merging with the Web and Email Activity Table to create metrics.
- Create Supporting Tables in Snowflake - Web Activity Data and Email Activity Table - create mock data for this and insert it to snowflake.
- Enrich the data to calculate lead score table by calculating the following metrics:
- Web Activity Score - Shows interest in your product on your website based on clickstream rate and demo requests
- Email Engagement Score - Indicates how engaged a lead is your email programs,based on open & click ratesLead Score - Helps GTM teams prioritize their outreach, based on leads most likely to convert
- Conversion Rate - Tells you which lead is likely to sign up for a service or make a purchase, and ultimately become customer.
Here's what the code will look like.
CREATE OR REPLACE TABLE DEMO.MATIA.ENRICHED_LEADS AS
SELECT
l.lead_id,
l.first_name,
l.last_name,
l.email,
l.company,
l.industry,
l.source,
l.annual_revenue,
l.lead_status,
l.is_converted,
l.created_at,
-- Web activity metrics
w.website_visits,
w.demo_requests,
-- Email engagement metrics
e.email_opens,
e.email_clicks,
--Web Activity Score: visits * 5 + demos * 20 (capped at 100)
LEAST(
COALESCE(w.website_visits, 0) * 5 + COALESCE(w.demo_requests, 0) * 20,
100
) AS web_activity_score,
-- Email Engagement Score: opens * 3 + clicks * 10 (capped at 100)
LEAST(
COALESCE(e.email_opens, 0) * 3 + COALESCE(e.email_clicks, 0) * 10,
100
) AS email_engagement_score,
-- Composite Lead Score (weighted avg)
ROUND(
0.5 * LEAST(COALESCE(w.website_visits, 0) * 5 + COALESCE(w.demo_requests, 0) * 20, 100) +
0.5 * LEAST(COALESCE(e.email_opens, 0) * 3 + COALESCE(e.email_clicks, 0) * 10, 100),
2
) AS lead_score,
-- Conversion Rate by Industry
ROUND(AVG(CASE WHEN l.is_converted = 'Converted' THEN 1 ELSE 0 END) OVER (PARTITION BY l.industry),2) AS conversion_rate
FROM DEMO.MATIA.LEADS l
LEFT JOIN DEMO.MATIA.WEB_ACTIVITY_DATA w ON l.lead_id = w.lead_id
LEFT JOIN DEMO.MATIA.EMAIL_ENGAGEMENT_DATA e ON l.lead_id = e.lead_id;
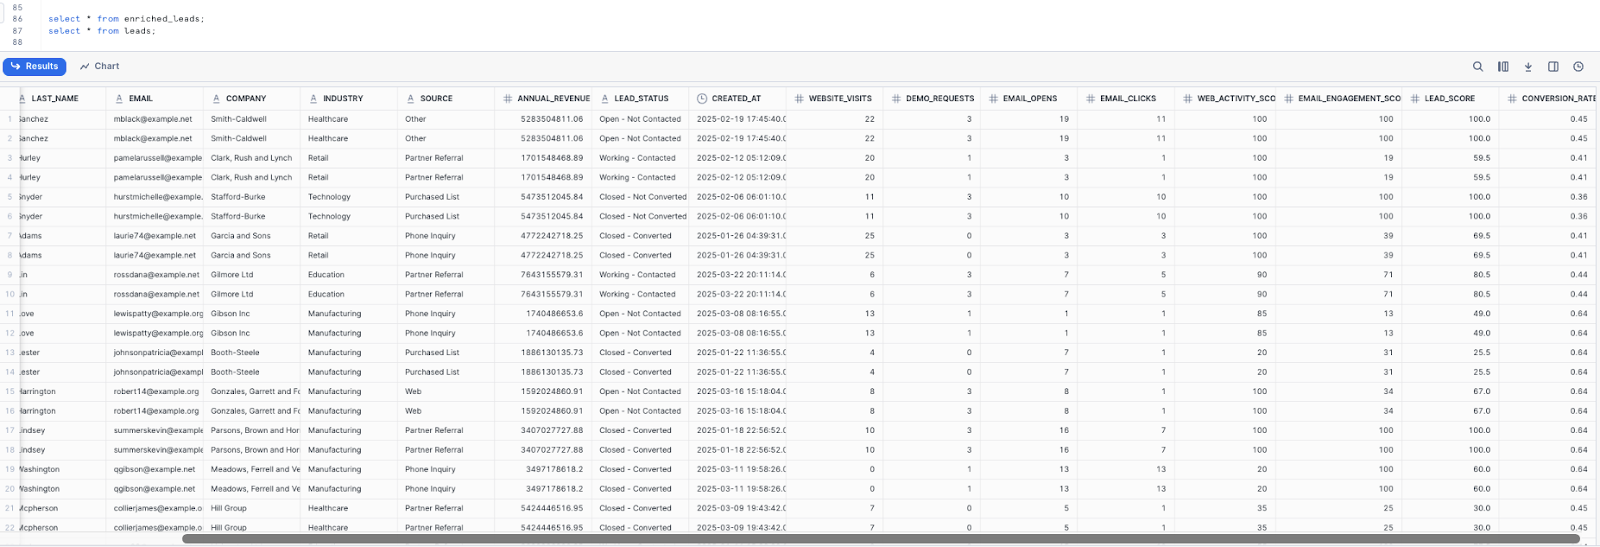
select * from enriched_leads;
Step 5: Set up Salesforce API access
If you have a Salesforce Developer Account and generated an Access Token from the Salesforce’s REST API, you can use a Python Script - using Simple Salesforce and requests library to push the leads table back to Salesforce as an enriched data in the Leads object.
If not, download Salesforce’s REST API CLI - and run the following command:
sf org display --target-org <your_username>6@agentforce.comThis displays your ACCESS_TOKEN and you can save it.
Step 6: Add custom fields in Salesforce
To update the Leads Table with updated columns, you need to create a new custom fields in Salesforce before pushing the Snowflake’s enriched leads table to Salesforce.
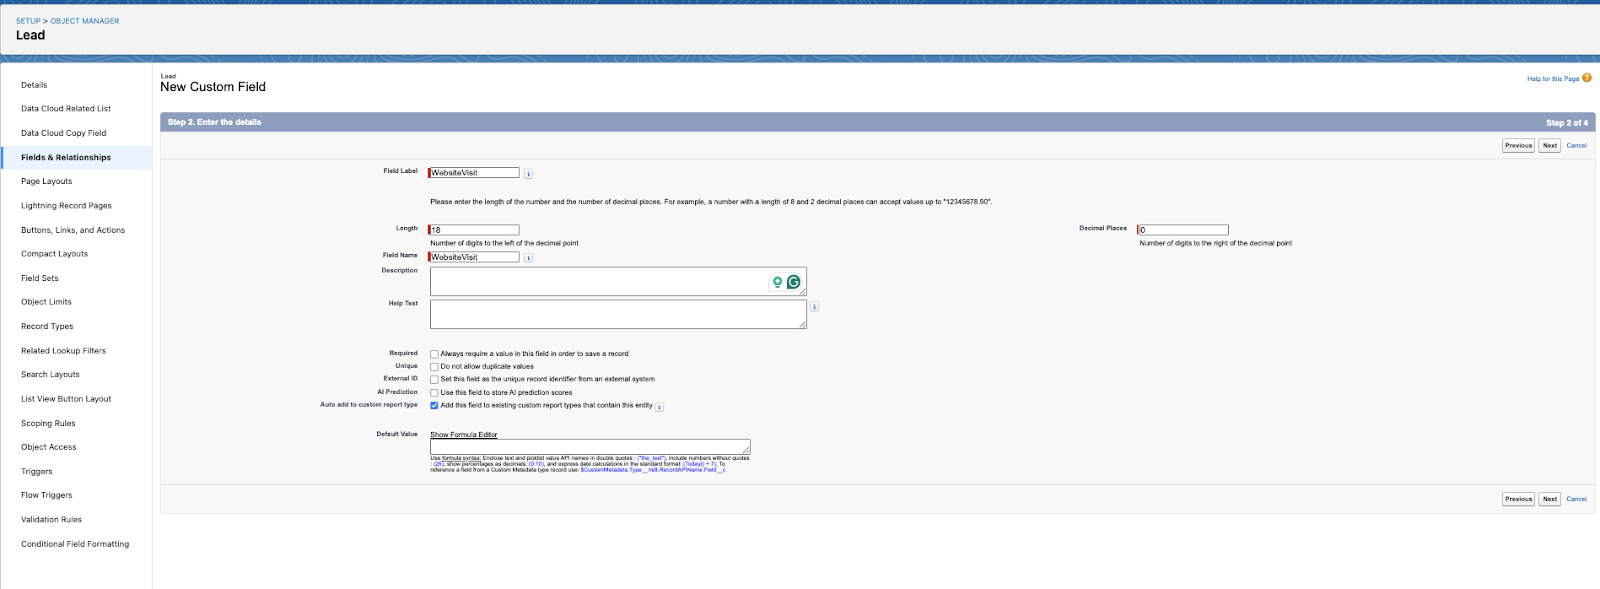
“WebsiteVisit” is a new metric added to the Leads Table in Snowflake, so we need to introduce this custom field to Leads Object in Salesforce, and do it for all the metrics introduced to enrich the leads data.
Step 7: Query the enriched leads from snowflake
Next, we can write a python script to read from the Snowflake table.
import pandas as pd
extract = "SELECT * FROM ENRICHED_LEADS"
enriched_leads_df = pd.read_sql(extract, conn)
Step 8: Upsert enriched leads table back into Salesforce
The following script will push back the Leads enriched data with metrics we created in step 2.
# Example: mock_leads_df from earlier or from your leads data
# Let's loop through it and upsert into Salesforce
headers = {
   "Authorization": f"Bearer {ACCESS_TOKEN}",
   "Content-Type": "application/json"
}

def upsert_lead_record(row):
   external_id = row["LEAD_ID"]
   url = f"{INSTANCE_URL}/services/data/v63.0/sobjects/{OBJECT_API_NAME}/{EXTERNAL_ID_FIELD}/{external_id}"

   # Prepare the payload for Lead object upsert
   payload = {
       "FirstName": row["FIRST_NAME"],
       "LastName": row["LAST_NAME"],
       "Email": row["EMAIL"],
       "Company": row["COMPANY"],
       "Industry": row["INDUSTRY"],
       "LeadSource": row["SOURCE"],
       "AnnualRevenue": float(row["ANNUAL_REVENUE"] or 0),
       "LeadStatus__c": row["LEAD_STATUS"],
       "CreatedAt__c": pd.to_datetime(row["CREATED_AT"]).strftime("%Y-%m-%dT%H:%M:%SZ"), #Custom field
       "WebsiteVisit__c": row["WEBSITE_VISITS"], #Custom Field
       "DemoRequests__c": row["DEMO_REQUESTS"], #Custom Field
       "EmailOpened__c": row["EMAIL_CLICKS"], #Custom Field
       "WebActivityScore__c": row["WEB_ACTIVITY_SCORE"], #Custom Field
       "EmailEngagementScore__c": row["EMAIL_ENGAGEMENT_SCORE"], #Custom Field
       "LeadScore__c": row["LEAD_SCORE"], #Custom Field
       "ConversionRate__c": row["CONVERSION_RATE"] #Custom Field
   }

   response = requests.patch(url, headers=headers, json=payload)

   if response.status_code in [200, 201, 204]:
       print(f"Synced: {row['FIRST_NAME']} {row['LAST_NAME']} ({external_id})")
   else:
  print(f"Failed for {external_id} -- {response.status_code}: {response.text}")
# Run the upsert for each lead in the mock leads DataFrame
for _, row in enriched_leads_df.iterrows():
   upsert_lead_record(row)
Here is the output on Salesforce that includes metrics such as Email Engagement Score, Web Activity Score, Lead Score, and Conversion Rate.
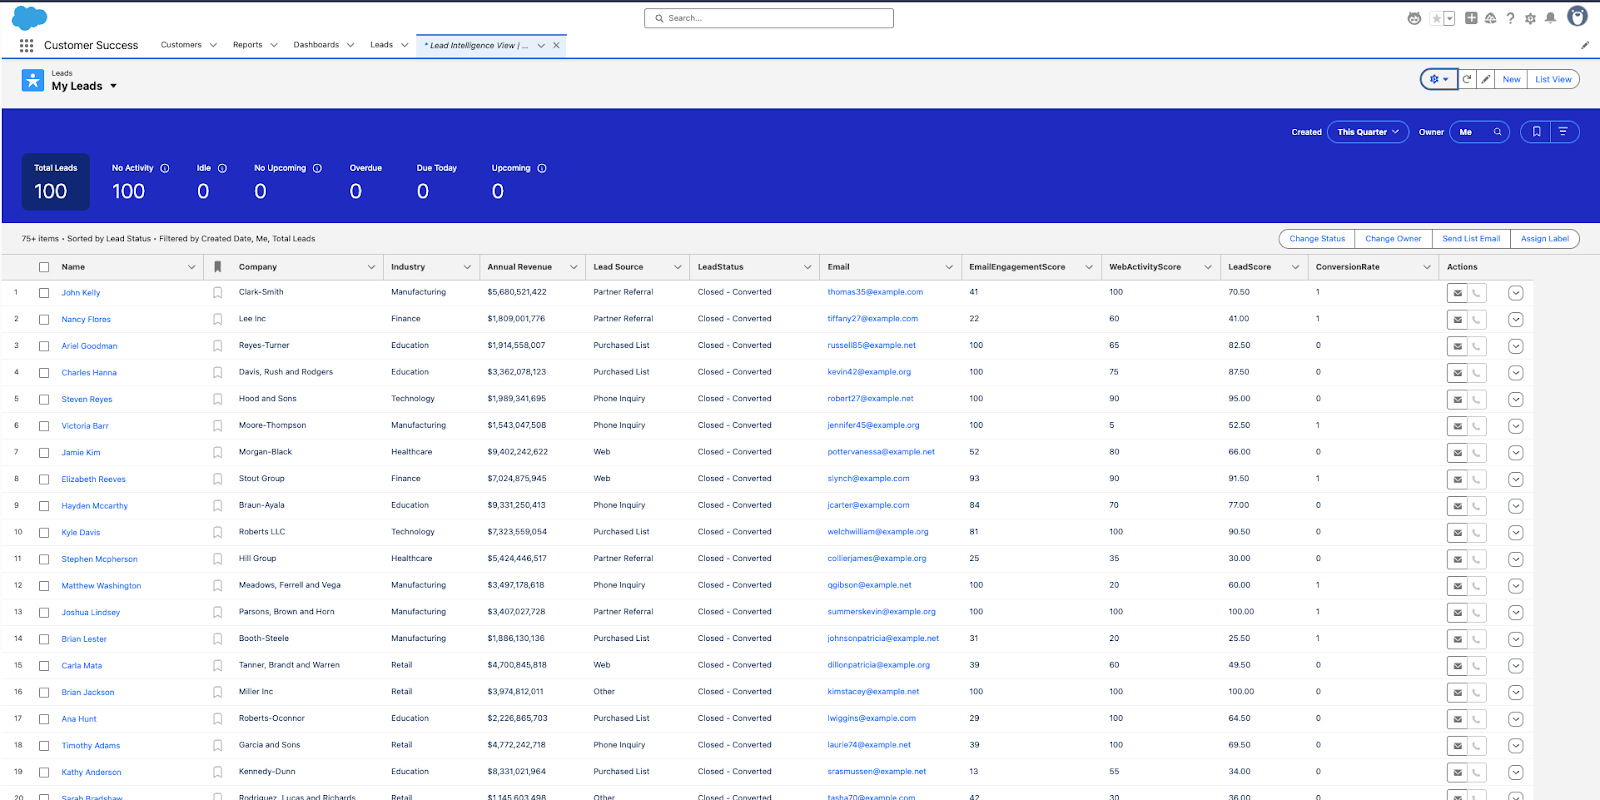
This Reverse ETL process activates data stored in Snowflake so GTM teams can leverage it. Sales reps can prioritize their outreach based on the “Lead Score”, and the conversion rate can be beneficial in determining which leads convert best, and the Marketing Team can shape the marketing campaigns for the Leads based on web and email engagement scores.
Automation using Airflow (Optional)
Orchestration tools like Apache Airflow are essential for automating and scheduling reverse ETL pipelines from Snowflake to Salesforce. Using PythonOperators, Airflow executes custom scripts to extract, transform, and push enriched data to Salesforce, with task sequencing, retries, and monitoring built in. Challenges arise when the Snowflake schema changes—for example, with added or removed columns—which can cause DAG failures. To handle this, a cleanup task can be added to delete or truncate existing Salesforce data before replication, ensuring safe reprocessing. As pipelines shift to incremental loads, complexity increases, Airflow’s flexibility allows for robust, scalable workflows that adapt to evolving data needs.
Potential challenges and complexities with manual reverse ETL pipelines
Setting up a manual Reverse ETL process (Extract, Transform, Load) using the REST API and a Python script seems relatively simple, but there are several technical issues that may arise that are worth pointing out.
- Managing API Permissions and Access Control
When working with the Salesforce API, you must ensure ] the data conforms to the API specification, manage the permissions that may involve complex role based access controls (RBAC), and implement secure authentication and authorization mechanisms. This includes handling access tokens, which must be periodically to maintain systems connectivity.
- API Rate Limits
Salesforce imposes strict API rate limits (e.g., 15,000/day per org or 1,000/day per user), which makes syncing data updates from Snowflake to Salesforce in real time challenging. If you trigger an API call for every minor update (like a lead status change), you'll quickly hit these limits—especially if you're syncing records one at a time via the REST API. Bulk API has higher daily limits, and could be used for periodic syncs for high volume data operations.
- Logging, Monitoring & Incremental Syncing
Tracking successful and failed syncs from Snowflake to Salesforce is critical but can become inefficient at scale. A structured logging system—such as a Snowflake table or dashboard—helps monitor sync status, record counts, and timestamps. While Snowflake and Salesforce offer basic logging, tools like Matia provide built-in monitoring.
To improve efficiency, use incremental syncing instead of full reloads. Implement a last_synced_at field or delta logic to sync only new or updated records, reducing API calls and simplifying monitoring.
- Schema Drift
Schema drift occurs when the structure of source data changes, causing potential sync failures if not addressed. As we saw on the earlier example, when syncing to Salesforce, custom fields must be created to match your data model. If field types don't match, Salesforce’s API will reject the request.
To manage this, monitor schema changes and maintain a metadata store for both systems. Since Salesforce APIs don’t support true upserts, you must track whether records should be created or updated—adding complexity to the pipeline. Validating data types between systems is essential, but without automation, it can be time-consuming and error-prone.
- Automation with Orchestration Tools
Automating a manual Reverse ETL process can be significantly improved by using orchestration tools like Apache Airflow or Prefect. These tools automate scheduling, monitoring, and execution of Python scripts, reducing manual intervention and enhancing pipeline efficiency. Automation allows for incremental data syncing by tracking last_synced_at fields, ensuring only updated records are sent to Salesforce and minimizing unnecessary API calls. Airflow also supports data validation tasks to maintain consistency and prevent schema drift errors. However, setting up Airflow, defining tasks, and managing dependencies can be time-consuming and would require the engineering team to manage as well.
Method #2: Reverse ETL as a managed solution with Matia
Managed solutions offer a more seamless and scalable way to activate your data. Once you’ve created your first pipeline, each additional one is increasingly easier and faster to set up.
We’ll walk you through how streamlined this process is on Matia.
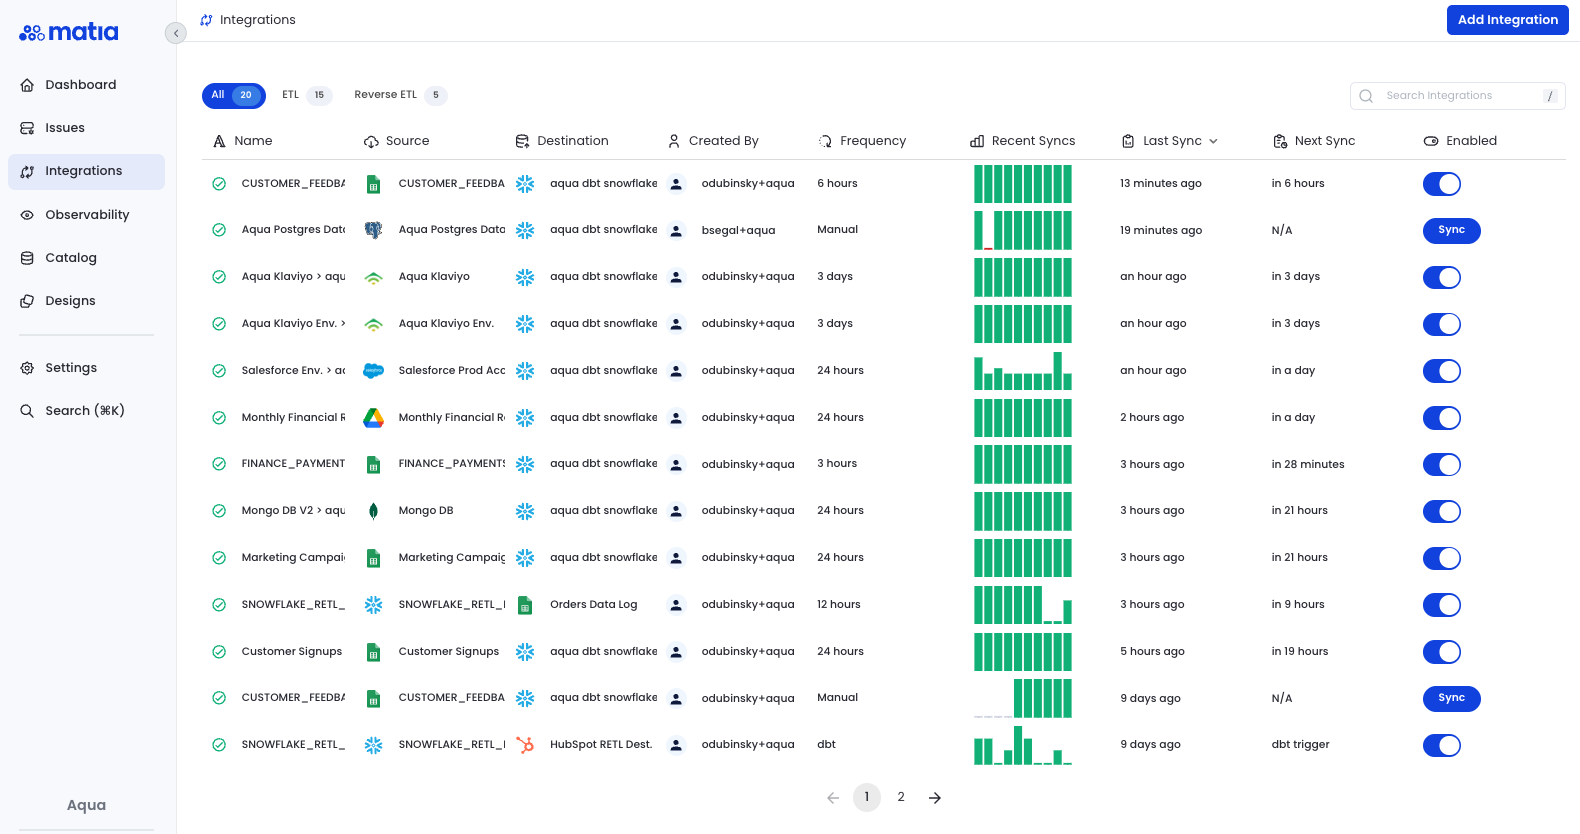
Step 1: Navigate to the Integrations page and click Add Integration
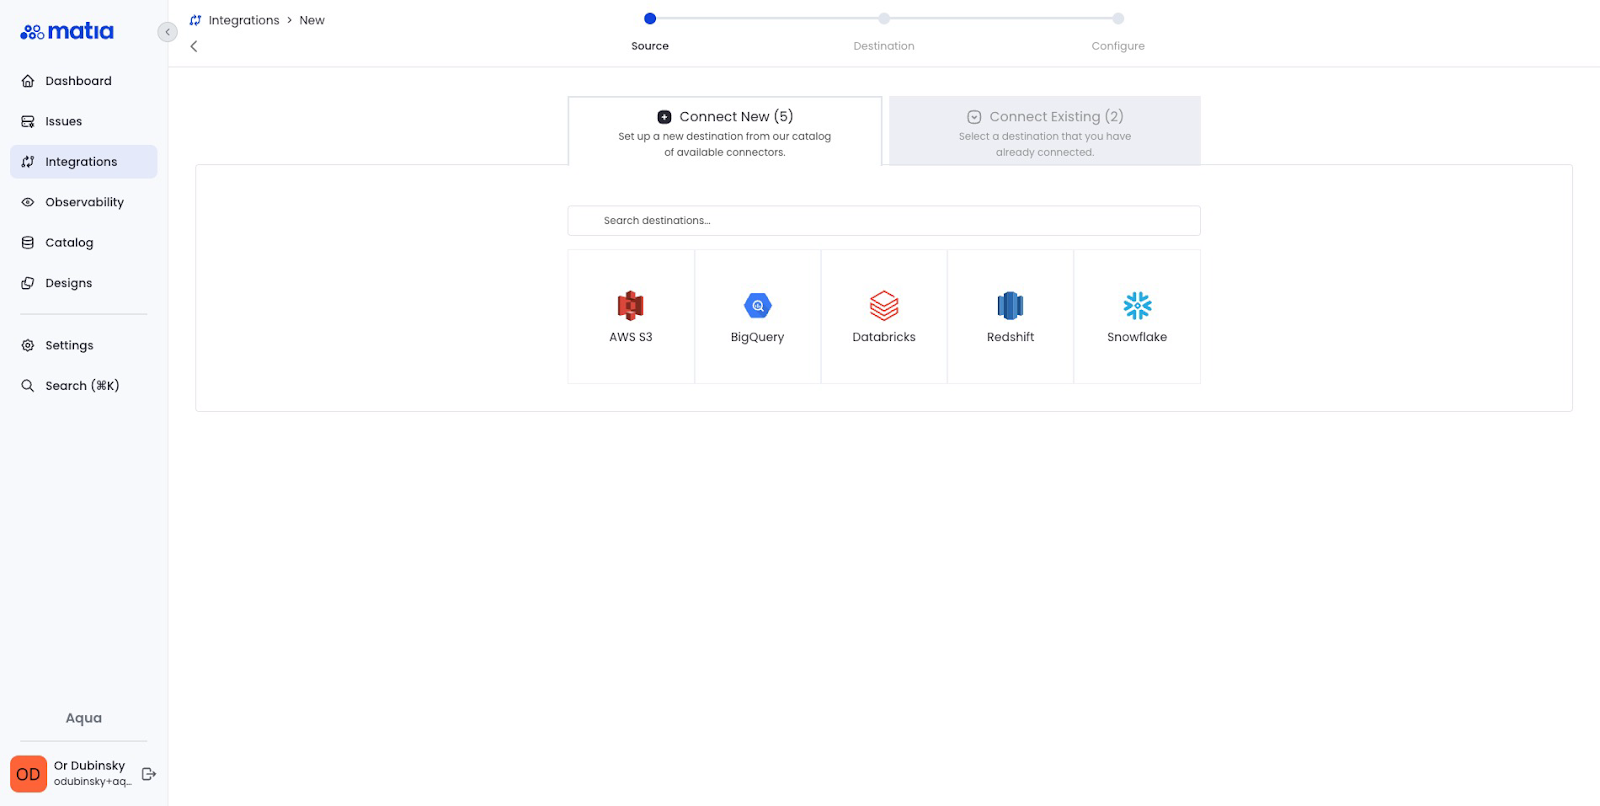
Step 2: Select your data warehouse provider and connect it to Matia
Matia includes detailed documentation embedded within the product .
In this case, we’ll be using Snowflake to mirror the example above.

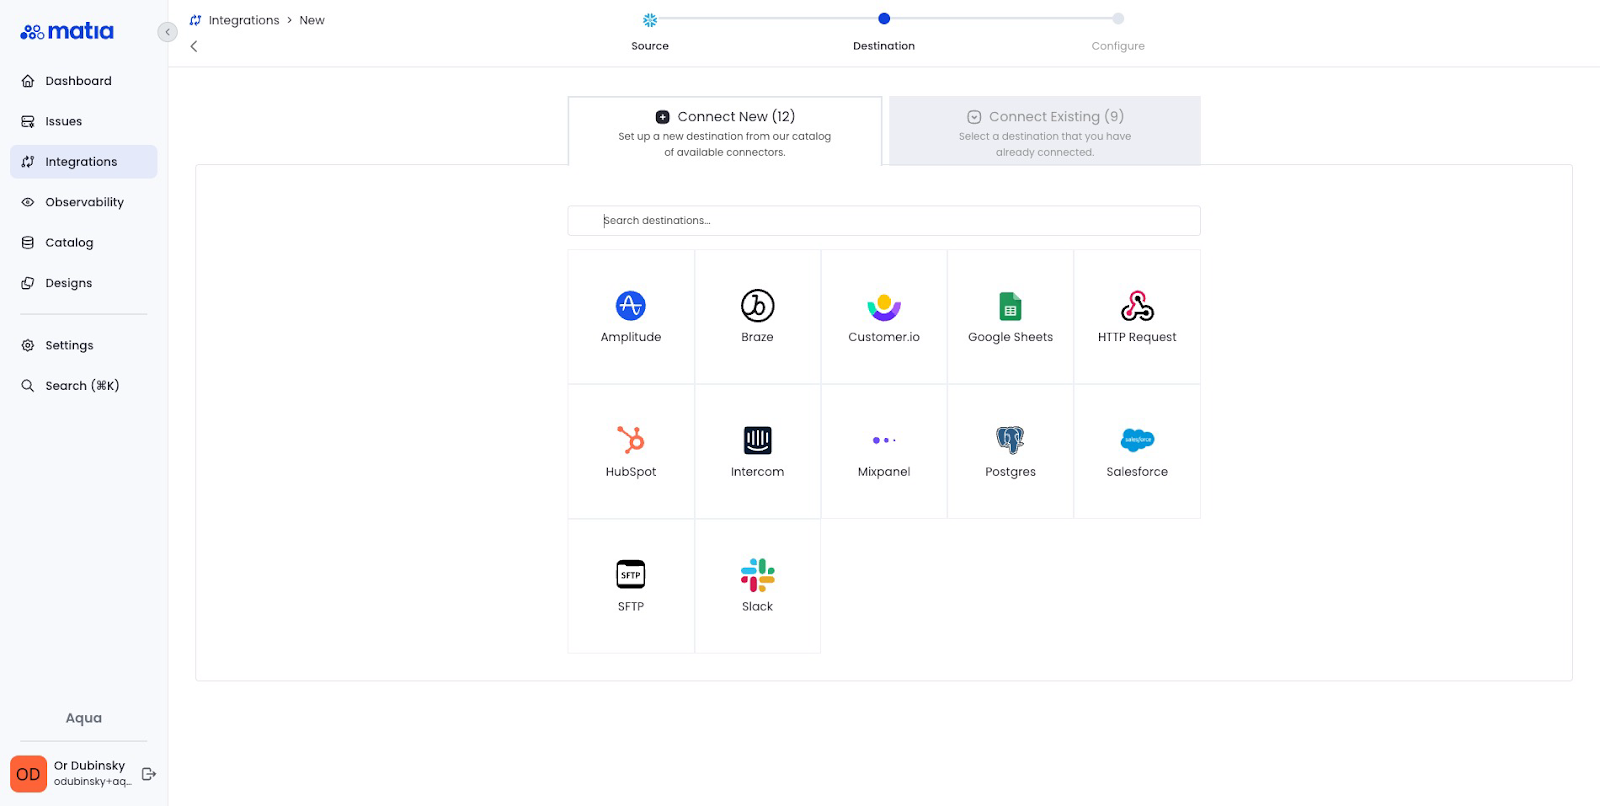
Step 3: Select your chosen destination and grant Matia permissions
Grant Matia Write permissions. Most destinations support OAuth authentication, reducing the connection process to a single click.
Step 4: Configure the Integration
To configure the integration, follow the following steps:
- Select the trigger type. In this case, we're going to use dbt Cloud as a trigger and we'll select the specific dbt Job we want to use as a trigger.
- Configure the source model. We’ll paste a prepared SQL model which would serve as a source for the data we’re looking to push into Salesforce.
- Select the destination object. Find the specific object in Salesforce you'd like to push data into.
- Select a sync mode. Matia supports various sync modes, allowing you to customize the way you want to push data into your destination. In this case, we’ll go with Mirror mode which syncs inserts, updates, and deletions.
- Configure the mapping. We’re going to select the source primary key and any additional field mapping we’d like to use to customize the destination object.
Step 5: Validate your setup
Select ‘Run Test’ and Matia will select 1 random row from your model and push it into your destination.
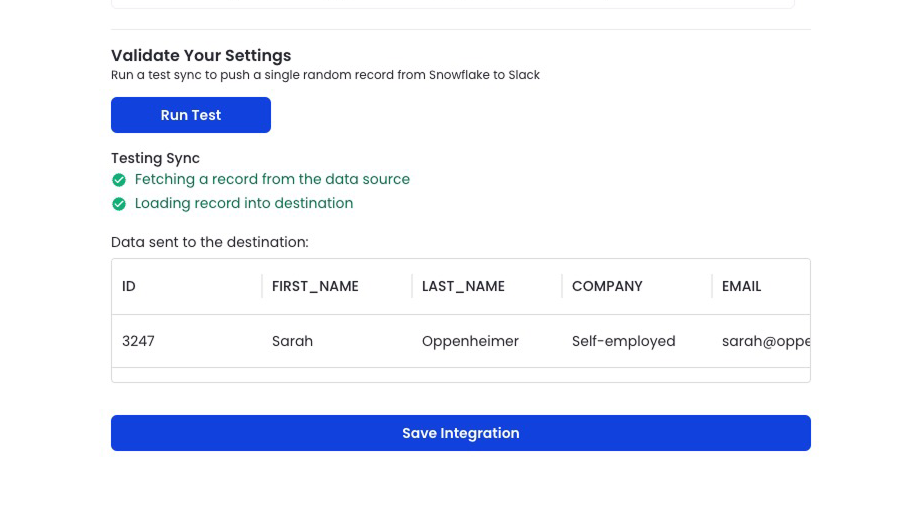
And you're done. Watch your data flow into Salesforce.
Building a manual vs managed reverse ETL pipeline
Implementing Reverse ETL requires making a key decision: should you build and maintain a pipeline in-house or use a managed solution? This choice impacts everything from development time and engineering resources to scalability and reliability. While a manual approach may seem like a simple choice, it also comes with significant maintenance and operatiional overhead. On the other hand, a managed solution abstracts away complexity, enabling teams to focus on leveraging data rather than moving it.
Let’s break down the trade-offs between these two approaches.
Building a manual Reverse ETL pipeline gives you control over how your data flows from your warehouse to operational tools like Salesforce. While this approach can move your data from A to B, or in our case, warehouse to end tool, it also comes with challenges around API management, schema drift, error handling, and maintenance overhead.
For organizations looking to move fast, reduce engineering burden,and ensure reliability at scale, managed Reverse ETL platforms like Matia offer a more streamlined and scalable alternative. You can get started with a free trial of Matia here to test it out for yourself.
Whether you build or buy, the end goal remains the same: to activate your data and make it actionable where your teams work.


.png)